Quick Start
Prerequisites
Cloak is a framework consisting of a Cloak Network and a Cloak language compiler described as Introduction. Up to now, we haven’t deployed a public test Cloak Network to provide Cloak Service. Please deploy a Cloak Network for yourself if you want to use Cloak, following Initialize Cloak Network on Blockchain.
To run the demo, we need some dependecies in our container (plytools/cloak-tee:latest).
# nodejs
curl -fsSL https://deb.nodesource.com/setup_16.x | sudo -E bash -
sudo apt-get install -y nodejs
# ganache-cli  the blockchain backend
npm install -g ganache-cli
# truffle
npm install -g truffle
# solc
sudo apt-get install software-properties-common
sudo add-apt-repository ppa:ethereum/ethereum
sudo apt-get install solc
# java
apt install openjdk-11-jdk
Generally, we ask three terminals for container to run our demo. The terminal order is also the execution order we require.
T1: it runs the blockchian (e.g., ganache-cli)
T2: it runs the Cloak Network.
T3: it represents the user’s terminal, compiles the cloak contract and deploys the contract.
Here, we focus on the process of using Cloak.
Installation
There are two ways to install compiler, the easier way is to use docker or install it to any host that you want. **For convenience, we recommend the same container plytools/cloak-tee:latest in ** Initialize Cloak Network on Blockchain. Note that, Cloak Compiler is implemented by Python 3, so you need to prepare an environment that includes an executable Python 3 and pip3, and its version is at least greater than 3.8.
Clone code:
git clone https://github.com/OxHainan/cloak-compiler.git
cd cloak-compiler
Install dependencies:
pip install -r install/requirements.txt
Setup:
python3 setup.py develop
Cloak by Examples
Using Cloak requires the following seven steps:
Write a Cloak contract file.
Compile it via Cloak Compiler to generate public_contract.sol, private_contract.sol and policy.json.
Register your public key to CloakService contract.
Deploy public_contract.sol to Cloak Blockchain.
Deploy private_contract.sol to cloak-tee.
Bind policy.json to the private contract.
Propose or participate a transaction.
Here we will show you how to finish there steps through demo.cloak:
A Glance of Cloak Contract
This is the demo.cloak, representing the Cloak contract of the first step. Here, we pay attention to the steps of using it rather than the details. A detailed description is presented in Cloak Compiler.
// SPDX-License-Identifier: Apache-2.0

pragma cloak ^0.2.0;

contract Demo {
    final address@all _manager;                  // all
    mapping(address => uint256) pubBalances;     // public
    mapping(address!x => uint256@x) priBalances; // private

    constructor(address manager) public {
        _manager = manager;
        pubBalances[manager] = 1000;
    }

    //  PRT-me
    //
    // @dev Deposit token from public to private balances
    // @param value The amount to be deposited.
    //
    function deposit(uint256 value) public returns (bool) {
        require(value <= pubBalances[me]);
        pubBalances[me] = pubBalances[me] - value;
        priBalances[me] = priBalances[me] + value;
        return true;
    }

    //  MPT
    //
    // @dev Transfer token for a specified address
    // @param to The address to transfer to.
    // @param value The amount to be transferred.
    //
    function multiPartyTransfer(address to, uint256 value)
        public
        returns (bool)
    {
        require(value <= priBalances[me]);
        require(to != address(0));

        priBalances[me] = priBalances[me] - value;
        priBalances[to] = priBalances[to] + value;
        return true;
    }
}
For demonstrating the demo.cloak, We use the following test account as an example.
private key: 0x55b99466a43e0ccb52a11a42a3b4e10bfba630e8427570035f6db7b5c22f689e
address: 0xDC8FBC8Eb748FfeBf850D6B93a22C3506A465beE
Compile Cloak Contract
After the running of cloak service, we can compile the cloak contract. For example:
cloak compile --contract --combined-json <CLOAK CONTRACT>
e.g.
cloak compile --contract --combined-json /project/evm4ccf/cloak-client/samples/demo/demo.cloak
There are four important files in the output directory, including contract.cloak, public_contract.sol, private_contract.sol and policy.json.
contract.cloak: the cloak contract of your business.
public_contract.sol: a solidity contract, it will be deployed to Blockchain.
private_contract.sol: a solidity contract, it will be deployed to cloak-tee and be executed by eEVM in TEE environment.
policy.json: a privacy policy definition of the Cloak smart contract binding to the private contract.
Deploy and Transaction
The remaining steps will be carried out through cloak-client. We have writed a sample that uses cloak-client to show you how to register pk, deploy public/private contract, bind privacy policy and propose a PRT/MPT transaction, etc.
Clone cloak-client and change directory to sample/demo:
git clone https://github.com/OxHainan/cloak-client.git
cd cloak-client
npm install
cd cloak-client/samples/demo
npm install
cp /project/evm4ccf/cloak-service-contract/build/contracts/CloakService.json .
Run command:
# CCF_AUTH_DIR: a directory that includes CCF network.cert, a user cert and pk, typically workspace/sandbox_common/ under cloak-tee build directory if you use sandbox.sh setup cloak-tee.
# COMPILE_DIR: cloak-compiler output directory
node index.js <CCF_AUTH_DIR> <COMPILE_DIR>
e.g.
node index.js /project/evm4ccf/cloak-tee/build/workspace/sandbox_common/ /project/evm4ccf/output
More detailed usage is in the cloak-client document, and the full sample is in the code.
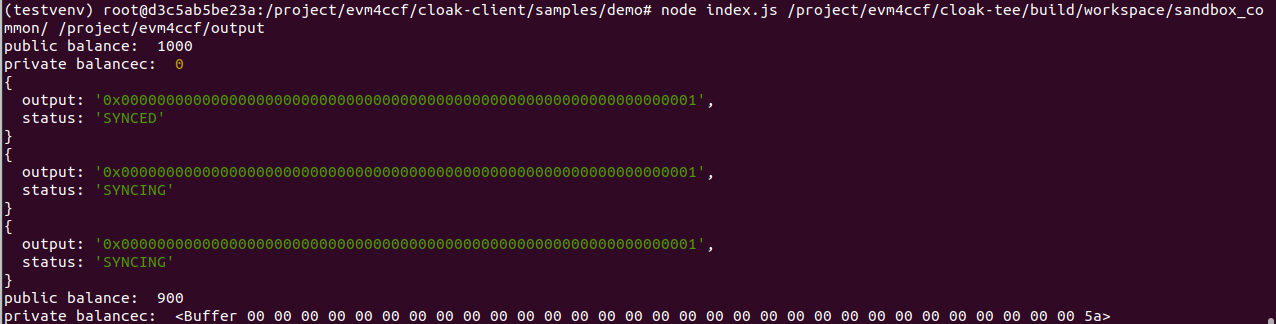
It shows the result of the successful running of the demo, meaning the execution of multiPartyTransfer in index.js.
Note
Close the proxy if you have set it, otherwise the Cloak Network fails to run.